Over the past several months, I've come to appreciate KDE applications—especially Amarok, Kaffeine and Konqueror. Unfortunately, KDE eats RAM like Cookie Monster once ate cookies. (Those were the days.) So I went back to Fluxbox.
One of my biggest frustrations with Fluxbox used to be the keybindings. The default keyboard shortcuts aren't much like the ones I know from GNOME and KDE. I would often hit Alt+F4, expecting the window to close, and instead get switched to Workspace 4. Then I discovered how easy they are to customize.
The first time you log into a Fluxbox session, it creates a directory ~/.fluxbox where it stores a small handful of config files. Among them is the keys file. All you have to do is remove the bindings you don't want and replace them with your preferred set. Here's mine:
Control F1 :Workspace 1
Control F2 :Workspace 2
Control F3 :Workspace 3
Control F4 :Workspace 4
Control Mod1 Escape :KillWindow
Mod1 F1 :RootMenu
Mod1 F2 :ExecCommand fbrun
Mod1 F4 :Close
Mod1 F9 :Minimize
Mod1 F10 :MaximizeWindow
Mod1 Shift Tab :PrevWindow
Mod1 Tab :NextWindow
I struck a compromise between the GNOME and KDE defaults. Note that Mod1 is the Alt key.
So, for example, I can press Alt+F2 and get what amounts to a "Run…" dialog. Then I enter a command, like xterm, and I'm on my way. It's an particularly handy binding for those who avoid the mouse whenever possible.
More detailed info can be found in the Fluxbox Keybindings section of the docs.
Showing posts with label gdm. Show all posts
Showing posts with label gdm. Show all posts
Sunday, August 05, 2007
Thursday, August 11, 2005
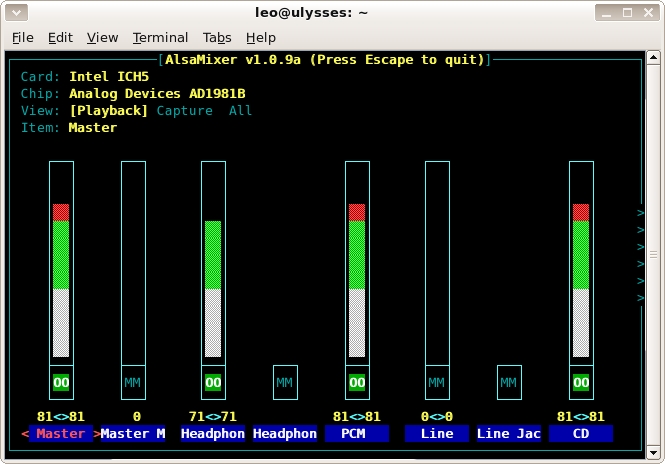
amixer is afriend
For whatever reason, I have to adjust the PCM track in order to change volume in GNOME; the Master track does nothing. I suspect it's something specific to my sound card. It isn't especially inconvenient as long as I want to use the volume control built into the GNOME panel. I just right-clicked on the speaker icon, selected Preferences and told it to control the PCM track. Unfortunately adjusting the volume using multimedia keys has proven more difficult.
GNOME 2 provides a utility to bind an action to a key or keys. It can be accessed from the terminal with the command gnome-keybinding-properties or from the GNOME Desktop (System -> Preferences -> Keyboard Shortcuts). However, if you want to perform an unlisted action, you'll have to use the Configuration Editor. In my case, I wanted to adjust the PCM track volume.
The GNOME Configuration Editor can run from the terminal with the command gconf-editor or from the GNOME Desktop (Applications -> System Tools -> Configuration Editor). I used it to set key bindings for Metacity.
Using Xev and Editing Xmodmap
Before I could begin I needed to know if the keys to which I wanted to bind actions already had keysyms—symbolic names for keys on the keyboard—assigned to them. I opened the terminal and entered xev.
Xev prints the contents of X events. According to its manual, "Xev creates a window and then asks the X server to send it events whenever anything happens to the window…" This includes typing. So pressing a multimedia key should return something like this.
KeyPress event, serial 29, synthetic NO, window 0x3000001,
root 0x8e, subw 0x0, time 412303, (-458,206), root:(527,303),
state 0x10, keycode 160 (keysym 0x0, NoSymbol), same_screen YES,
XLookupString gives 0 bytes:
XmbLookupString gives 0 bytes:
XFilterEvent returns: False
We're interested in the third line. "NoSymbol" indicates that there isn't a keysym assigned to keycode 160. Therefore I had to add them to my X keyboard map. First I exported the existing map to a file in my home directory (/home/josh on my system).
xmodmap -pke > xmodmap.conf
I added the missing keysyms for the corresponding keycodes. There's a specific set of names you must use, listed in /usr/lib/X11/XKeysymDB. I saved and closed the file. Then I applied the changes.
xmodmap xmodmap.conf
At this point, you could actually read ahead and bind actions to the keysyms to see if they work. Of course, the new keyboard map isn't just for this session. We want to load it when X starts. Following the advice of Corey Burger, I added it to the PostLogin script of gdm.
sudo cp xmodmap.conf /etc/xmodmap.conf
cd /etc/X11/gdm/PostLogin
sudo cp Default.sample Default
sudo gedit Default
We need to add the line xmodmap /etc/xmodmap.conf to the end of the file. Now we're ready to use the Configuration Editor.
GNOME Configuration Editor
Run the Configuration Editor and navigate to /apps/metacity/global_keybindings. There should be 12 keys with "run_command" in their names. Right-click on any of them and select "Edit Key…" from the popup menu. Enter the keysym of the desired multimedia key in the "Value" field. Repeat these steps for each multimedia key you want to use. Next we'll tell Metacity which command to run when these keys are pressed.

The ALSA mixer can be controlled from the command line with amixer. To mute/unmute the PCM track, you would enter amixer -q sset PCM,0 toggle. To lower or raise the PCM track volume by 10 percent, you would enter amixer -q sset PCM,0 10%-,10%- unmute or amixer -q sset PCM,0 10%+,10%+ unmute respectively. These commands become the values for the appropriate keys. The changes take effect immediately, so you can verify that the commands work as expected before you close the Configuration Editor. If you used the values I did, you should now be able to control the PCM track volume from your keyboard.
GNOME 2 provides a utility to bind an action to a key or keys. It can be accessed from the terminal with the command gnome-keybinding-properties or from the GNOME Desktop (System -> Preferences -> Keyboard Shortcuts). However, if you want to perform an unlisted action, you'll have to use the Configuration Editor. In my case, I wanted to adjust the PCM track volume.
The GNOME Configuration Editor can run from the terminal with the command gconf-editor or from the GNOME Desktop (Applications -> System Tools -> Configuration Editor). I used it to set key bindings for Metacity.
Using Xev and Editing Xmodmap
Before I could begin I needed to know if the keys to which I wanted to bind actions already had keysyms—symbolic names for keys on the keyboard—assigned to them. I opened the terminal and entered xev.
Xev prints the contents of X events. According to its manual, "Xev creates a window and then asks the X server to send it events whenever anything happens to the window…" This includes typing. So pressing a multimedia key should return something like this.
KeyPress event, serial 29, synthetic NO, window 0x3000001,
root 0x8e, subw 0x0, time 412303, (-458,206), root:(527,303),
state 0x10, keycode 160 (keysym 0x0, NoSymbol), same_screen YES,
XLookupString gives 0 bytes:
XmbLookupString gives 0 bytes:
XFilterEvent returns: False
We're interested in the third line. "NoSymbol" indicates that there isn't a keysym assigned to keycode 160. Therefore I had to add them to my X keyboard map. First I exported the existing map to a file in my home directory (/home/josh on my system).
xmodmap -pke > xmodmap.conf
I added the missing keysyms for the corresponding keycodes. There's a specific set of names you must use, listed in /usr/lib/X11/XKeysymDB. I saved and closed the file. Then I applied the changes.
xmodmap xmodmap.conf
At this point, you could actually read ahead and bind actions to the keysyms to see if they work. Of course, the new keyboard map isn't just for this session. We want to load it when X starts. Following the advice of Corey Burger, I added it to the PostLogin script of gdm.
sudo cp xmodmap.conf /etc/xmodmap.conf
cd /etc/X11/gdm/PostLogin
sudo cp Default.sample Default
sudo gedit Default
We need to add the line xmodmap /etc/xmodmap.conf to the end of the file. Now we're ready to use the Configuration Editor.
GNOME Configuration Editor
Run the Configuration Editor and navigate to /apps/metacity/global_keybindings. There should be 12 keys with "run_command" in their names. Right-click on any of them and select "Edit Key…" from the popup menu. Enter the keysym of the desired multimedia key in the "Value" field. Repeat these steps for each multimedia key you want to use. Next we'll tell Metacity which command to run when these keys are pressed.
The ALSA mixer can be controlled from the command line with amixer. To mute/unmute the PCM track, you would enter amixer -q sset PCM,0 toggle. To lower or raise the PCM track volume by 10 percent, you would enter amixer -q sset PCM,0 10%-,10%- unmute or amixer -q sset PCM,0 10%+,10%+ unmute respectively. These commands become the values for the appropriate keys. The changes take effect immediately, so you can verify that the commands work as expected before you close the Configuration Editor. If you used the values I did, you should now be able to control the PCM track volume from your keyboard.
Friday, August 05, 2005
Comfortably Num
I like to use the numeric keypad for entering long numbers. To that end, I would prefer to have X11 turn on Num Lock by default. Luckily I'm not the only one who feels that way. Chua Wen Kiat has been kind enough to provide an easy way to invoke Martin-Éric Racine's numlockx utilities at the start of a new X11 session.
We're going to download the numlockx package. Then we'll back up the system file we'll be editing and open it.
sudo apt-get install numlockx
sudo cp /etc/X11/gdm/Init/Default /etc/X11/gdm/Init/Default.bak
sudo gedit /etc/X11/gdm/Init/Default
The last line of the file should read exit 0. Just above that line, we're going to add the following.
if [ -x /usr/bin/numlockx ]; then
/usr/bin/numlockx on
fi
Save the edited file. If you want the change to take effect immediately, close all applications and enter the command sudo /etc/init.d/gdm restart, which will restart GNOME.
Please note that for reasons unknown to me the above command does not work as expected on some systems. Mine is one of them. If the command kills GNOME but fails to restart it, you could enter sudo reboot from the console or switch back to the console where X11 was running (Ctrl+Alt+F7) and reboot from there (Ctrl+Alt+Del). You may also be able to start a new session with the command startx -- :consolenumber, where consolenumber is the number of an unused console. In any case, Num Lock should now turn on at the beginning of each new session.
Subscribe to:
Posts (Atom)